

How to Install Shiplap Ceiling for DIY Camper
- The Desert Cruisers

- Mar 27, 2024
- 5 min read
Updated: Apr 6, 2024

Having shiplap ceiling boards is when everything starts to feel very real! You'll notice that your build is starting to have a finished feel and there's something so satisfying about putting up shiplap for your ceilings and walls. This is also when you can wrap up your 12V Puck Lights Install and MaxxFan Install.
Parts and Tools For Shiplap Ceiling Install

1x3 furring strips
Shiplap 12ft
Self tapping Hex screws #10 1 1/2"
Ryobi Compound Miter Saw
Drill
Wago lever nuts for MaxFann
Preparing Your 1x3 Furring Strips

Your furring strips are crucial for mounting your shiplap ceiling. We opted for 96-inch 1x3s from Home Depot, securing them to all 11 roof steel studs across our 14-foot box.
You'll want to cut the 1x3s to your roof size and ours was 90.5 inches wide. After cutting with our Ryobi Miter Saw, we evenly spread out five screw locations. We used this first board as a template for all the other furring strips, clamped this one board to another and pre-drilled all of them.
Now that all the boards are cut and predrilled, you'll want to buy a forstner bit that is bigger than the screw size you are using. A forsnter bit is used to help recess your screw head by removing wood. We don't want our mounting screws to stick out when it's time to install the shiplap boards, so that is why we use it. Once you get all of that tedious work out of the way, your furring strips are prepped and ready to be installed!
Installing Furring Strips to Ceiling
You'll want to glue and screw these furring strips up to the studs. We used loctite premium construction adhesive and put a bead of glue on the 1x3s, and screwed them in with self tapping hex screws. Our screws were an 1 1/2" long, which was perfect for our 1x3s to connect with our steed studs.


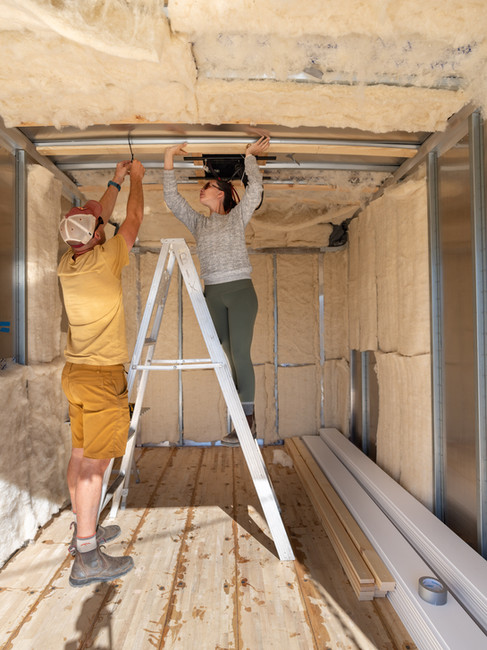
Now that you have your furring strips up, you’ll have a mounting location for your shiplap boards. Be sure that you ran wire for your 12v Puck Lights. We did a full blog on that here.
Once your wires are ran, it’s time to install the shiplap! You'll also want to put up your choice of insulation. We used Havelock wool and it works great!
Prepping your Shiplap Boards
We have a 14ft box and our length of our shiplap boards from Home Depot are 12ft long so it almost covers the whole ceiling. For the areas that it can't reach, we cut up 2ft shiplap pieces near the rear and had the 12ft and 2ft meet on a furring strip to screw into. You can get longer than 12ft, but we didn't have the means of transportation to get them to our build site so we settled for these ones and it worked out great.

Now, it's time to measure where the furring strips are inside the box and mark them on the shiplap. We brought in a board of shiplap and traced where the studs were to mark each of them.
Since we have 11 studs in the truck there will be 11 points to screw into the shiplap. We didn't want to see all the screws exposed so our plan was to countersink . We chose four rows where we will see exposed gold screws because we think it looks nice. The rest will be countersunk with a forstner bit. Then wood fill the holes, sand it down and paint the boards.

Keeping things consistent was key for us, so we made use of a shiplap board with markings as our template. It was very easy lining it up with new boards, ensuring perfect screw points and stud locations. With a clamp in place, we drilled all the holes, and repeated this process for the other boards.
Installing your Shiplap Boards
This was a two person job. Having a third person would have been so helpful considering how long they were, but we did just fine. You need to be 100% sure if you are happy with it. So take the time and be certain that it’s straight when starting that first board. After one board is up, that sets it up for how they are all mounted and then it’s pretty quick! Super exciting!

Once we got our four boards up, we knew it was time to plan for our lights on the next board. We had already ran wire for our 12V puck lights install and wired them together and this board seemed like the best location for our first set of 4 lights. We spread out evenly where we wanted our holes to be for our puck lights, so after we were satisfied with the measurements, we used a 2 1/4" hole saw.

Now that you have your holes, it's time to put this board up, screw them up and insert your wires through the holes. We didn't glue our shiplap boards because our living space is separated by our cab, and we don't hear any creaks anyway! But you can definitely use glue to help minimize vibrations if you're going to hear it all the time when driving but it's not necessary.
Finishing the Trim Pieces and Little Details
Once that board is up, we used wago lever nuts to wire our lights so it was easy enough to undo our temporary hanging lights, disconnect and pull the wires through the holes. We also covered the wires with braided wire loom to help protect it.

We also had to measure and cut the ceiling boards to fit around the fan and ac which isn’t that hard, but measure multiple times and be sure of everything!
Since 12ft is only part of our 14th foot box, we had to cut some smaller pieces of the back to be smaller, but no worries because most of this will be covered by our tall shower and cabinets in the back and we’ll just put a trim piece to cover the fan areas.

Now, we can trim out the fan flange for the MaxxFan. You can slide it up in you roof. The easiest way to know how to trim your fan flange, is to insert the fan flange into your ceiling to however far it can go, mark where it stops, and then that measurement you get from your marking to where is stops is what you want to measure from the bottom up and that is where you will cut it. Clamp it to a table, use a drill bit and then use your jigsaw to cut it up. The cut doesn’t need to look pretty because it won’t be seen anyway.
Last but not least, it's time to wire the MaxxFan! We used two slot wago lever nuts to wire it easily. Keep note that on the MaxxFan, negative is white wire and positive is the black wire. Once you're done, shove your wires up and then put your fan flange in and screw in.

After those couple of tedious cuts and trim pieces are done, it's time to get the rest of the shiplap up and there you have it! Now that those are in, you can wood fill the areas, sand them down, and start painting.


fly88 mình cũng kiểu nghe mọi người nhắc hoài nên bấm vào xem thử cho biết thôi, chứ không định ngồi soi nội dung gì nhiều. Vừa vào cái thấy trang nhìn khá dễ thở, không bị rối mắt hay nhồi chữ lung tung. Mình thích nhất là cách họ chia khối rõ ràng nên kéo xuống một chút là nắm được đại khái đang ở phần nào, đỡ phải đoán. Mấy chỗ hiển thị thông tin dạng bảng cột nhìn gọn, liếc nhanh là hiểu, hợp với kiểu chỉ xem lướt như mình. Với lại thanh menu đặt ngay chỗ dễ thấy nên chuyển qua lại cũng tiện, không phải mò lâu. Nói chung cảm giác dùng khá mượt…
https://keonhacai.cam/ mình vô thử đúng kiểu tò mò thôi, thấy mấy đứa bạn hay nhắc nên ghé xem giao diện thế nào. Vừa mở lên là thấy trang làm khá thoáng, chữ với các khối nội dung nhìn tách bạch nên đọc lướt cũng dễ, không bị ngợp hay phải căng mắt tìm chỗ cần xem. Mình thích cái cách họ sắp xếp phần chính rõ ràng, kéo xuống vẫn theo mạch chứ không loạn. Có đoạn nói về tải app thì viết ngắn gọn, kiểu giải thích dùng app thao tác nhanh và ổn định hơn so với trình duyệt, đọc phát hiểu luôn. Nói chung cảm giác dùng như một trang được canh gọn gàng, mấy box thông…