

DIY Window & Door Installation for DIY Camper or Box Truck with Tern Overland Arctic Tern
- The Desert Cruisers

- Apr 6, 2024
- 11 min read

Does the thought of cutting holes into your precious camper scare you? Well it definitely scared us! But that didn’t stop us from executing it! We installed a Tern Overland Artic Tern Cargo Door for our Mountain Bikes, 2 Wildlands Doors, and 3 windows! The thought of cutting holes for windows scared us away from doing it ourselves the first time in our Sprinter Van Build. But now that we’ve gained experience and knowledge into the installation process, we felt fully prepared (as much as possible) to tackle this task!
Why Tern Overland Arctic Tern Windows and Doors?
They are acrylic dual pane windows, which keeps it more insulated and much quieter inside the camper. It also comes with built in black out blinds and bug screens. They look clean, and they have different depths of thickness depending on your wall thickness which make it versatile for all DIY builds. Arctic Tern Wildlands Entry Door is a great door that locks with a dead bolt just like a house, and they also have a screen door that can be separated from the main door and locked so that you can have proper ventilation. They also have door covers to give your tiny home some privacy or to simply black it out for sleeping.


Disclaimer: No, the doors do not come in tan! But it's easy to get painted by a local shop or if you plan to DIY it yourself. We recommend Bullet Liner! They did our whole truck in Desert Tan which has always been a dream for us!
Knowing your Locations for Installing Tern Overland Windows and Doors

We had very limited space, and thanks to Tern’s selection of windows, that wasn’t an issue finding the right size. You need to plan out your locations and if there will be any preventing factors to installing a door or window in a specific place. Here is a diagram on our plan for windows and doors in our build. Once you’re happy with your ideas of your build, it’s time to install them!
Parts & Tools

Arctic Tern Window 550x1100mm, 45-54mm (big sink/galley window)
Arctic Tern Window 550x700mm, 45-54mm (bed window)
Arctic Tern Window 450x500mm, 45-54mm (kitchen window)
Arctic Tern Cargo Door 600x900mm
Cardboard
Duck Tape
Vacuum
Baltic Burch Plywood
Blue Painter’s Tape
Scotch Brite Pad
Ryobi Compound Mitersaw
Cargo Door Install for Mountain Bikes
We got the Arctic Tern Cargo Door 600x900mm. This door gave us just enough height and width to easily take our 4 bikes in and out of the garage. We couldn’t have gone with a bigger cargo door as much as we would have liked to at the time, but we were limited with space by our bed frame height and didn’t want to raise the interior of our bed any higher, so this was a perfect fit!
Making a Template for Cargo Door Install
The doors or windows do not come with a template, but they gave us a clear idea on how to trace out our desired size. First, grab a piece of cardboard. They come with the doors when packaged, so we used those initially.
The center most flange on the door frame which is about a half inch wide is what you want to trace your template off of! So we cut off a colored pencil and lined it up and we traced it out at a slight angle inward.


We used a box cutter to cut out our template.
Once we cut out the door template, we decided to put that on a piece of scrap wood that we had. When we purchased our Baltic Burch plywood, it came with a cheap piece of wood and this was perfect as a template. Assuming you don’t have a piece of wood to practice on, we HIGHLY RECOMMEND purchasing OSB Plywood. It was extremely cheap from our local Home Depot at around $13 a sheet during the time of our build, and we used the OSB for the rest of our templates that we’ll show later on. You can get 2-3 sheets of OSB for piece of mind. It is most definitely worth the purchase to test out a cut that is very important to your build. We did not want to risk just assuming a cardboard template will do the job.
So we cut the piece out of our test wood with our drill bit set and jigsaw. Because we didn’t like the fitment, we did it again on the same piece of wood since we still had room!
Side Note: Also we were very nervous for our first big cut on the truck, so we were going to make as many templates as possible. And after this first round of testing and fitting, we got more comfortable with the process on others doors and windows in the build.
The second time we cut out the hole for our cargo door, it was perfect for us! Rose and Chiquita (our families dogs) also approved of the door in case you were wondering. ✅


Finishing up the Template for the Cargo Door

Since we were happy with the second cut (like I said we were nervous), we knew this wasn’t going to be a final template. Based on your own comfort, you obviously do not have to be as picky as us and move forward! But don’t feel like there’s a magic number on templates. Cutting a legit hole for a door is a big deal and feeling confident and comfortable is priority.
Like I said before, we had bought OSB Plywood from Home Depot. Another reason for using OSB is how lightweight it is, which is perfect for mounting and taping up to your locations to trace with. It really made so much sense doing this for us.
Mount the Template onto your vehicle
Once you trace your template, it’s time to tape it up! Duck tape did just fine for us considering how light the OSB template was. For our box truck, we knew that we only wanted to cut out one stud for this entry door so that partially dictated where it would end up in our build, and we also factored in our layout of the garage that would hold our electrical, plumbing, storage and four bikes. This was the best placement for our door and today, we are extremely happy with it and wouldn’t change our location at all!
Trace your Template with a sharpie & time to cut!
When tracing your template, don’t make it look like a creepy clown like Cody did. 😉 Just kidding. Then use a drill bit to start a point for the jigsaw.

When using the jigsaw, we taped the bottom of it so that it didn’t scratch anything up as we cut through. Let the jigsaw go at its own pace, and really control the curve when cutting the corners.
Once we got most of the jigsaw cut done, we knew we had a steel stud to cut, so out comes the angle grinder!

And there you have it! Your hole is officially there! Whohooo! Use a metal file to remove and rough edges and be sure to spray some Rust-Oleum around the steel stud cuts.
Test fitting the cargo door
Time to bring in your cargo door to make sure that it fits perfectly.

Making the Wall for the Door inside the box
For the wall, we were only using a 1/4 inch sheet of baltic burch plywood. We cut the width and height to make sure it would fit under our bed. Once the piece of wood was placed under the bed, I traced the door opening from the outside. Doing this will not give you exact opening size from the other side. To be honest, there isn’t a good tip here aside that you may need to increase the opening size by a couple of centimeters like we did to get the opening flush around the trim ring of the cargo door inside.


Framing the Cargo Door in the Box Truck
This is a very custom job depending on what kind of vehicle you have, so make this step based on your type of vehicle or box since it varies.
We had lots of strips cut up of 1/2” and 3/4” that would sit near flush to our steel studs. We wanted all of our walls to sit just on top of the studs so this is why we did this.

The cargo door gets secured from the inside of the door jam, and that’s where your mounting points will be.
So after cutting our pieces, we used glue and clamped and screwed our pieces of wood up. We had some rivets pultruding out of the box that we used as helpers for the wood pieces to sit against. We used Loctite Heavy Duty Adhesive as its rated for wood to aluminum applications. Make sure to clean your surface prior to adhering glue. We also scraped it up with a metal brush to help the glue adhere to more texture. We also pocket screwed it into the floor with a Kreg Jig Kit for extra strength.

We bought a million clamps so that we didn’t have to waste time waiting for things to glue and cure overnight, and so that we could do it all at once.
All our wood pieces are connected by pocket screwing them all in the framing.
Official Install of the Cargo Door
First thing you’ll be doing is taping number 10 tiny washers and placing them on the glue flange which is right behind the face of the door. This helps give you a little bit of a gap when you put your door up against your install surface and that is enough room for the glue to be spread out evenly when it’s time to install. When we’re going to do first is, once you have those four washers placed, two on the top and two on the bottom, you are going to bring that door over and insert it in the installation location. Then you’ll be screwing in the locations on your frame with the door inserted. Once you do that, then you can remove it and prep it for glue and install it.
The screws are provided for this door installation. For the dry fit, do not use the silicone washers yet. Only use them on the final installation.
You’ll need a 1/8 and a 3/16 drill bit. You’ll start with a 1/8 and then use the 3/16 to accommodate the screw size.
So bring your door over to your location and scope out where the screw holes will be. We did two on the bottom and two on the top for now, just so we have those locations and to make sure that the door works and if we’re happy with it.
With our holes predrilled, we did a light screw in for a dry fit and that allowed us to look at the fitment. Then once you are satisfied, take out the screws and remove the door for the next final installation steps. We continued to drill the rest of our mounting locations on the door with it removed.
Time to Glue!

Remove the taped on washers. Remember the washers were only there to help the initial screw locations so that the glue now has space to distribute. Use a scotch bright pad, and start scraping along the edges of the inside of the flange and thats going to help the glue adhere to it. We used Loctite Heavy Duty Power Grab. Good for aluminum to aluminum applications. Run a 1/4” bead. Make sure that your install location of the door has blue tape or something around it for the glue to press up against so that you can remove it easier later on. And now that door is on with the glue, screw it in, use the silicone washers with it and your door is officially installed. Let it sit for a day, cut the excess glue off and remove your tape. Tip* It was hard to take the glue off waiting as long as we did, so maybe after a couple of hours, grab a razor to cut around the areas as the glue hardens and that may make it an easier process.
Installing rivnuts for the wall inside
While everything was drying, we installed rivnuts for the wall. We left the baltic burch natural because it just looks so dang clean!


Installing Tern Overland Wildlands Main Entry Door
This was pretty much the same process as the cargo door but at a much larger scale. Started off with our cardboard template.
This is the tracing you'll want to do and once that cardboard is cut, you'll test fit it over the door. This process is definitely harder to trace out because the handle of the door gets in the way and becomes higher on the cardboard on one side, but that's why the cardboard is not our initial template. Make a couple templates until you are happy.

Once that fitment was close enough, we traced the cardboard template on the OSB for our final fitment. Again, fit the template over the door to make sure that it fit perfectly.
We brought the OSB template over to our box, taped it up, and traced it with a sharpie and got cutting!


Once we filed down the edges, we test fitted the door. This part was a bit stressful to do even with two people with how heavy the door is. So having three people is very nice to have if you have that option!
Now that the door fit well, we did the same process of framing as the cargo door with our 1/2” and 3/4” plywood. This is a custom job depending on your DIY build.

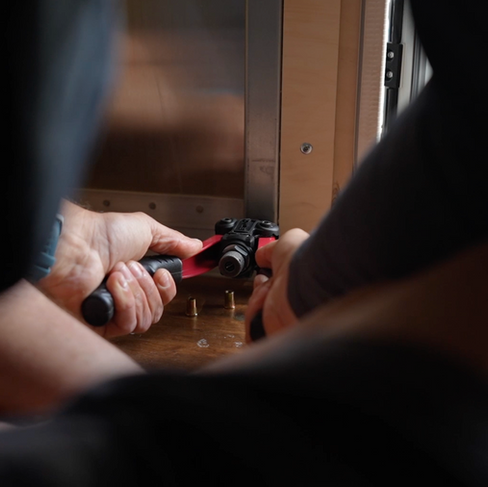
We made sure our surface was scuffed before gluing and clamping the wood frame. Once the wood framing was in and glued for 24 hours, it was time to put our number 10 washers around the glue flange on the door. Again this is to help provide a gap for the initial screw locations so that the glue has space to distribute. With the washers on, we inserted the door to its install location and drilled out our hole locations using a a 1/8 and a 3/16 drill bit just like the cargo door.
We screwed three location on the bottom and top, and did every 12 inches along the height of the door. Then we removed the door, placed blue tape around the outside of our box truck where the glue would spread over, used Loctite Premium 3x Strength Adhesive, (we liked this consistency of the glue better) and time to mount!
For the actual installation, we truly couldn’t have done this project without three people. The door part needed to be held by my dad, and the other part that would get screwed into our wood frame needed to be held by me while Cody did all the screw locations. It was such a good feeling having the door installed!

We also installed another door for the back deck by framing, and this was a much easier process since we could stand on the deck to do this install.

Arctic Tern Window Install
We had three locations for our window installs, one by our bed, one big one by our sink/counter area and one by our induction cooking location.
Arctic Tern Window 550x1100mm, 45-54mm Wall Thickness (big sink/galley window)
Arctic Tern Window 550x700mm, 45-54mm Wall Thickness (bed window)
Arctic Tern Window 450x500mm, 45-54mm Wall Thickness (kitchen window)
What’s in the window installation kit?
There’s really only three main pieces to the window:
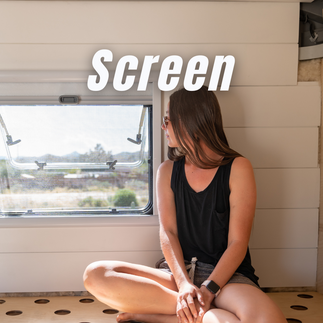
✅ Internal Screen with a bug screen or black out shade.
✅ The Internal Frame that sits on your walls inside your build.
✅ And then the window itself!


✅ It all comes with screws for the installation.
Tern offers four different frame thickness which is super helpful for any DIY camper build! And because of this, they have different screw options that can accommodate for the thickness selected.
Also the clips that the blind attaches to is on the top of the frame, so keep that in mind for the installation.
Making your Template
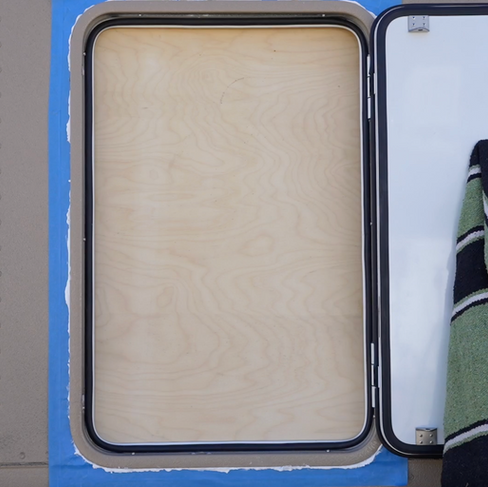
This was very straightforward. We used our OSB plywood, and we traced the internal frame. When looking at the window, you’ll see the metal clips, flip that around and that line on the inner side of the window frame is what the cut size is for your window. This was a much easier process considering this is a flat flange and easily traceable.

Once we cut out our test piece and fitted it, we taped up the OSB, traced with a sharpie on our box, and started cutting!


At this point, it's time to again make your wood frames around the windows to help keep it strong. You don't have to screw into this like the cargo door and wildlands door installation. It was just to help us have mounting points for our shiplap in addition to adding more structural integrity of the build. This is a custom part for any build, so do what you feel is best for yours.


Then when your window is officially in, have someone hold the window on the outside while the other person grabs the frame screws it in on the inside.

On the windows, there is a seal around it so that you don’t need to glue or adhere anything to it. Super easy install and worked out well for us! And there you have it! An official install of all your windows!


Comments